DTF transfers on dark garments have transformed how custom apparel looks and lasts, redefining expectations for durability and brightness. When designers and printers seek vibrant whites on dark fabrics, a strong white underbase paired with precise film and adhesive choices makes all the difference. Understanding the principles behind print preparation guides decisions on color layering, order of operations, and test-print strategies to preserve punch from tee to jersey. Effective results on dark apparel hinge on reliable equipment, calibrated ink densities, and careful curing so the finish stays bold through wash after wash. Finally, mastering the right heat and time settings ensures the adhesive activates cleanly without scorching the fabric, closing the loop from design to durable wear.
Viewed through a broader lens, direct-to-film transfers enable bold colors to sit atop dark textiles with precise control. Focusing on the brightness of the white base, the layering sequence, and reliable curing helps keep whites crisp and colors vivid on dark surfaces. Practitioners often discuss film-based transfer methods, adhesive varieties, and post-press finishing as routes to enhance wash durability and feel. In practice, testing on representative fabrics and dialing in temperature, pressure, and dwell time translate ideas into durable, market-ready apparel.
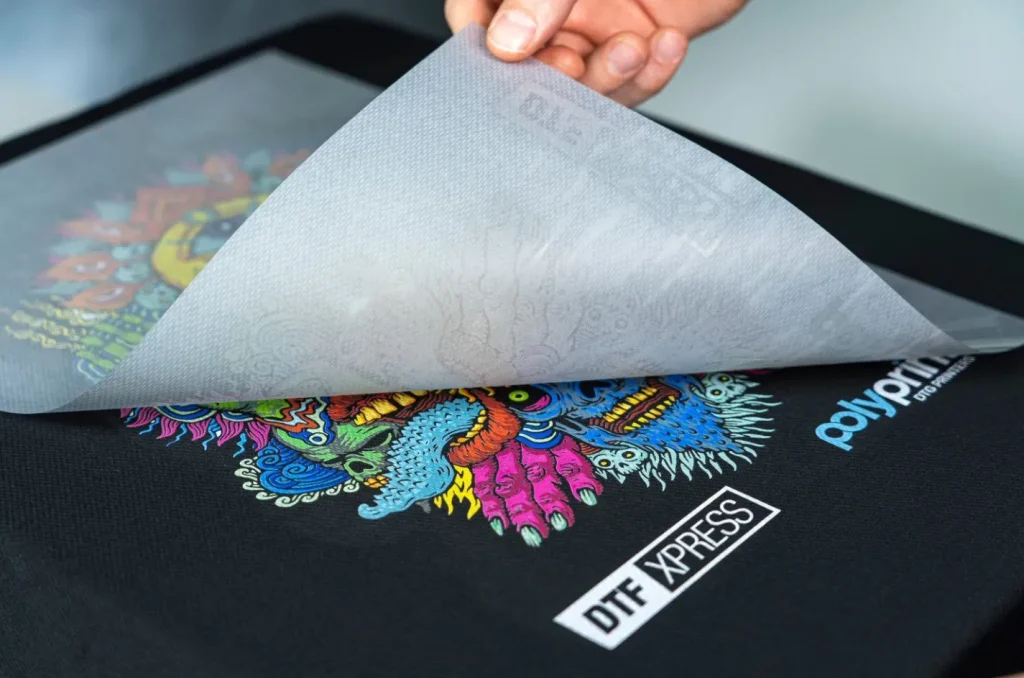
DTF transfers on dark garments: fundamentals and underbase strategy
DTF transfers on dark garments rely on a strong white underbase to reflect light and create a solid canvas for color. This foundational step is what enables non-white inks to appear vibrant and opaque against deep fabric tones. By selecting compatible white inks, precise printer calibration, and a film/adhesive system designed for maximum brightness on dark textiles, you can set the stage for crisp, long-lasting results.
In practice, the white underbase serves as the primary driver of vibrancy on dark fabrics. Designers and printers focus on opacity, even coverage, and consistent curing to prevent translucency or haloing at edges. This sub-base is not just a background—it determines how successfully subsequent color layers will pop, making it essential to test underbase strength across your garment types and production runs. DTF transfers on dark garments shine when the underbase is strong, stable, and well-tuned to your equipment.
Achieving vibrant whites on dark fabrics: color management and underbase precision
Vibrant whites on dark fabrics come from disciplined color management and deliberate underbase control. Calibrating printers for dark textile output, selecting profiles optimized for white opacity, and maintaining consistency across runs helps ensure whites stay bright over time. When you prioritize underbase precision, your color layers ride on a solid foundation, preventing dull or yellowed whites that can occur with improper density.
Beyond underbase, the layering strategy matters: opacity planning, color separations, and post-processing decisions all influence the final brightness. Practically, you’ll test brightness on representative garment swatches, adjust white opacity before committing to full runs, and verify color balance after each change. This approach aligns with the goal of vibrant whites on dark fabrics while integrating considerations from LSI terms like heat press settings for dark fabrics to ensure a complete, production-ready workflow.
Techniques for dark garment prints: design choices and testing
Design choices for dark garment prints emphasize contrast, bold shapes, and clear separations. High-contrast artwork reads more reliably on darker backgrounds, and strategic color layering can simulate lighter tones without sacrificing opacity. When planning designs, consider how each color will interact with the white underbase and how edge detail will translate after transfer and curing.
Thorough testing is a practical necessity in techniques for dark garment prints. Run test prints on your target fabric types to verify vibrancy, color balance, and edge definition before large production. This validation helps you adjust the print order, modify opacity, and confirm that layering will stay crisp across seams and textures—key factors for DTF printing on dark shirts.
DTF printing on dark shirts: materials, inks, and adhesion
DTF printing on dark shirts requires compatible inks, films, and adhesives that work together to deliver durable adhesion and bright color. Selecting a reliable film and adhesive system that pairs well with your printer and ink setup is critical, as is choosing appropriate powders and curing processes. The right combination reduces washfastness issues and helps maintain edge definition for both white underbase and top colors.
Material preparation and post-processing also play a crucial role in the overall outcome. Pre-washing to remove softeners and sizing, ensuring garments are fully dry, and choosing fabrics with suitable fiber content all support adhesion and durability. In practice, this means matching your DTF transfers on dark garments with fabric type, ink chemistry, and film formulation to achieve consistent results across different garments and garment families.
Heat press settings for dark fabrics: optimal temps, times, and pressure
The heat press is where many factors come together to finalize a DTF transfer on dark fabrics. Establishing a balance between temperature, pressure, and dwell time is essential to activate the adhesive without scorching the fabric. A typical starting range for many DTF processes is a temperature around 300–320°F (150–160°C) with a dwell of 12–20 seconds, using firm medium pressure to ensure complete adhesion.
Fine-tuning heat press settings for dark fabrics involves garment-specific adjustments and careful pre-press steps. Heavier jerseys, poly blends, and thicker textiles may require longer dwell times or slightly higher temperatures, while avoiding platen imprinting. Always run sample tests on the exact garment type you’ll use in production, confirming peel method (hot or warm) and ensuring consistent curing so colors stay bright and durable over time.
Frequently Asked Questions
What are DTF transfers on dark garments and why is the white underbase essential?
DTF transfers on dark garments rely on a white underbase to reflect light and keep colors vibrant. On dark fabrics, a strong white layer prevents colors from appearing dull or translucent, so use high-opacity white ink, proper printer calibration, and a film/adhesive system designed for brightness. This approach enables vibrant whites on dark fabrics and reliable color reproduction. Always run tests on your garment type to verify underbase coverage before full runs.
How can you achieve vibrant whites on dark fabrics with DTF transfers on dark garments?
Begin with a dedicated white underbase of sufficient opacity and calibrate your printer to minimize ink bleed. Use brightness-optimized underbase profiles and plan your color layering to preserve brightness across the print. Test on your target fabric to confirm vibrancy before committing to production.
What are the essential techniques for dark garment prints in DTF printing on dark shirts?
Focus on high-contrast artwork and solid color separations. Print color layers in an order that respects opacity changes—bold colors last to prevent bleeding into lighter areas. Always test portions of your design on the actual fabric to verify vibrancy and edge definition.
What heat press settings are recommended for DTF transfers on dark garments?
Starting guidelines: 300–320°F (150–160°C) for 12–20 seconds, with firm medium pressure. Include a brief pre-press to remove moisture and create a smooth surface before transfer, and follow your film’s hot or warm peel guidance. Adjust as needed for heavier jerseys or poly blends and always test on a sample garment.
What design and prep steps improve durability of DTF transfers on dark garments?
Choose 100% cotton or high-quality cotton blends when possible, and pre-wash fabrics to remove softeners and sizing. Ensure garments are fully dry before pressing, and select a reliable DTF film and adhesive compatible with your setup. Run test prints to verify adhesion, brightness, and edge definition before full production.
| Section | Key Points | Practical Tips |
|---|---|---|
| Introduction |
|
|
| Understanding the Basics |
|
|
| Design Considerations |
|
|
| Material Selection and Prep |
|
|
| White Underbase |
|
|
| Color Layering |
|
|
| Heat Press Settings and Curing |
|
|
| Troubleshooting: Common Issues |
|
|
| Care, Longevity, and Aftercare |
|
|
| Conclusion |
|
|
Summary
DTF transfers on dark garments offer a powerful way to achieve vibrant whites and bold color on dark fabrics. By focusing on a strong white underbase, thoughtful color layering, careful fabric prep, precise heat pressing, and proactive troubleshooting, you can deliver professional results across a range of garments. Printers who tailor settings to their equipment and garments, test rigorously, and iterate designs will maximize contrast and durability, producing high-impact, long-lasting prints that stand out on dark textiles.